Shadow DOM plays an important role in wold of web components as they provide an easy way to encapsulate, buu they were created imperatively using JavaScript, with something like:
12345678910
classFancyElementextendsHTMLElement{constructor(){super();this.ShadowRoot=this.attachShadow({mode:"open"});this.ShadowRoot.innerHTML="Shadow DOM imperative";}}customElements.get("imperative-fancy-element")||customElements.define("imperative-fancy-element",FancyElement);
Well, this works fine for client-side only application, but has lot of challenges to express and build them on the server (SSR), that when declarative shadow comes into picture!
Declarative Shadow DOM (DSD) helps us to have Shadow DOM to the server with ease, the sample imperative example as above would look like:
The inspector module provides an API that makes it easy to interact with the V8 inspector.
One can easily open a inspector like:
12345678910111213
constinspector=require("inspector");inspector.open();// <- inspector.open([port[, host[, wait]]])/*Debugger listening on ws://127.0.0.1:9229/ab01a630-90ad-4c87-91c9-a665632c1d8bFor help see https://nodejs.org/en/docs/inspector*/inspector.url();// 'ws://127.0.0.1:9229/ab01a630-90ad-4c87-91c9-a665632c1d8b'inspector.console.log("This should be visible on the debugger console");
But, most of times we would want to wait until the debugger is connected to our process, that's where inspector.waitForDebugger() will be useful, here is a quick example.
>nodefoo.js^Thiswouldmaketheprocesswaittillthedebuggerisconnected./* Debugger listening on ws://127.0.0.1:9229/b4b0e48d-2e4c-4cde-8177-6924c662aef4 For help, see: https://nodejs.org/en/docs/inspector Debugger attached. Waiting for the debugger to disconnect... */
Dispatching and receiving message responses and notifications is possible with the session API:
session.on(<inspector-protocol-method>) where the methods are from devtools-protocol.
P.S: This is an experimental API with Stability of 1 meaning is not subject to Semantic Versioning rules. Non-backward compatible changes or removal may occur in any future release. Use of the feature is not recommended in production environments.
The URLPattern web API is an URL pattern matching web-platform primitive as a generic javascript code. Also helps in controlling service worker to the subset of a site that it owns and maintains.
URLPattern() constructor accepts an Object as in input param as in the sample usage and and has test() and exec() methods.
Currently there is a partial implementation of URLPattern available in Chrome Canary under the "Experimental Web Platform features" flag.
Sample usage:
1234567891011
// Takes an Object as a param with the below optionsnewURLPattern({protocol:"https",username:"",password:"",hostname:"example.com",port:"",pathname:"/foo/bar/:image.jpg",search:"(.*)",hash:"(.*)",});
1234
// Say you want to match the pathname of `/products/(.*)`constproductsPattern=newURLPattern({"pathname":"/products/(.*)"})productsPattern.exec({"pathname":"/products/cars"}))
// Would return{"hash":{"groups":{"0":""},"input":""},"hostname":{"groups":{"0":""},"input":""},"input":{"pathname":"/products/cars"},"password":{"groups":{"0":""},"input":""},"pathname":{"groups":{"0":"cars"},"input":"/products/cars"},"port":{"groups":{"0":""},"input":""},"protocol":{"groups":{"0":""},"input":""},"search":{"groups":{"0":""},"input":""},"username":{"groups":{"0":""},"input":""}}
1234567
// imagePattern sample from the sepcconstimagePattern=newURLPattern({pathname:'/*.:imagetype(jpg|png|gif)'});if(letresult=imagePattern.exec(url)){returnhandleImage(result.pathname.groups['imagetype']);}
12345678
// apiPattern from the sepcconstapiPattern=newURLPattern({pathname:'/api/:product/:param?'});if(letresult=apiPattern.exec(url)){returnhandleAPI(result.pathname.groups['product'],result.pathname.groups['param']);}
// Service worker controlling /cars and everything under /cars/.// Does not control /carsearch.navigator.serviceWorker.register("/maps/maps-sw.js",{scope:newURLPattern({baseURL:self.location,pathname:`/cars/*?`,}),});
We also have the URLPatternList API in the proposals, that would help to do something like:
12345
// Match any URL ending with 'jpg' or 'png'.constp=newURLPatternList([{pathname:"/*.:filetype(jpg)"},{pathname:"/*.:filetype(png)"},]);
URLPattern API is highly influenced by path-to-regexp node module and support many of the features including:
The CSS Pseudo-Elements Level 4 (CSS4) provides an ability to select highlighted content, these represent a portions of a document that needs particular status and are typically styled differently to indicate that status to the user.
We have the below Highlight Pseudo-elements:
::selection: the portion of a document that has been selected as the target
::target-text: represents text directly targetted by the document URL’s fragment
::spelling-error: content that has been flagged by the user agent as misspelled.
::grammar-error: content that has been flagged by the user agent as grammatically incorrect.
Note: A future level of CSS may introduce ways to create custom highlight pseudo-elements.
The context API in svelte provides a way for components to communicate to each other without passing around data, functions props, or dispatching events!
Let us see a quick example:
12345678
// Parent has something like:<script>import{setContext}from'svelte'conststate={}setContext('state',state)</script>
123456
// In the descendants/child components<script>import{getContext}from'svelte'conststate=getContext('state')</script>
That was easy, but say you have sistuation where the context need to be update later in time, to emulate we could setTimeout(() => {setContext('state', {})},1000) this would not reflect either in the parent or the child component.
store comes to our resuse in these cases:
123456789
// In the parent component:import{setContext,getContext}from'svelte';import{writable}from'svelte/store';letstate=writable({color:'hotpink'});setContext('state',state);setTimeout(()=>{$state={color:'red'}},2000);// ^ Setting the store value after a timeout with assigment operation.
12345
// In the child component:import{getContext}from'svelte';conststate=getContext('state')// Access it like any other state variable, in this case `$state`
Here is a quick example:
This is explictily mentoined in the API docs too:
Context is not inherently reactive. If you need reactive values in context then you can pass a store into context, which will be reactive.
I just wanted to look into few frameworks on how they are handling multiple inputs particularly relating to the same value, if picked React, Vue and Svelte for this case study:
Say, you were to pick up some veggies from your salad today:
1
letveggies=["🥬","🌽","🌶","🥦","🍠"];
It would be better to have array of objects for topping like [{id: '', label: '', value: ''}] but for the ease of the demo, let us stick with an array for the toppings. We need to create a simple group of inputs of type checkbox.
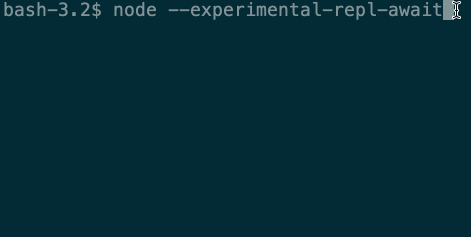
One can use await keyword outside of async functions with Top-level await and the happy news is you can use it today in node and REPL.
As of today, if we execute the bleow peice of code in node env:
1
awaitPromise.resolve(42);
We would see a: SyntaxError: await is only valid in async function
So, we would normally mitigate this by wrapping it in an async function:
1234
(asyncfunction(){constanswer=awaitPromise.resolve(42);// answer would be 42}());
But with top level await it get's easier we could just do const answer = await Promise.resolve(42); note that this will only work at the top level of modules only.
Well, Node.js v14.3.0 was released with the support of top-level await! But we always had a flag to enabled top-level await on the REPL, ever since node v10!
The --experimental-repl-await enables experimental top-level await keyword support in REPL, so all you have to do is start the REPL with the flag node --experimental-repl-await and that's it.
And within the script you could do something like: