Today happens to be the international nodeschool day and hence this post!
There are many ways of creating a nodeschool workshop, in this post I shall walk you through the steps of creating a workshop using a module /me authored named adventure-runner
First up install the module: npm install --save adventure-runner
All you need in your workshop root:
runner.js: The brain of the workshop.
problems dir: Where all your problems are located.
package.json: Like any other module.
runner.js would be like:
1 2 3 | |
or
1 2 3 | |
P.S: Use the first variant if the order of the problems are important.
The problems dir will have sub dirs of problem in it, in our example the
diansaurs dir must have a index.js in that, which would:
Exports problem statement with
exports.problemExports
verifyfunctionexports.verify = function(args, cb)whereargswould be the args passed from theCLItoverifyandcbwould decide if the solution to the problem was proper or not.
Let's create a simple nodeschool adventure, called adventure-math:
Basic dir setup:
1 2 3 4 5 6 7 8 9 10 11 12 13 14 15 16 17 18 | |
Write some code:
Fill the runner.js with the style you intent to use.
1 2 3 | |
Fill the problems/index.js with the problem.
1 2 3 4 5 6 7 8 9 10 11 12 13 14 15 16 17 18 19 20 21 22 23 24 25 26 | |
Mention the bin property in your package.json along with other fields, so
that it looks something like below [Even better if you had used npm init ;)]
:
1 2 3 4 5 6 7 8 9 10 11 12 13 14 15 16 17 18 19 20 | |
Final steps:
npm link to link the binary and now you must see something like below on
executing adventure-math on your CLI.
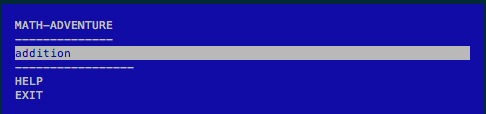
The user is expected to write the solution and verify it for themselves ;)
Hope you liked the post, feel free to modify the flow as per your need.
For the lazy ones here are few links:
adventure-ruuner-boilerplate boilerplate for the code mentioned above.
interview-time a module written using
adventure-runnerwhich would help you to practice for your technical interviews.
That's it for now, happy node-schooling! :)